Our Reglazing Process in Santa Clara, CA
A step-by-step look at how we prep, repair, etch, prime, spray and cure a fixture in Santa Clara — and the 5-year written warranty that backs it.
Direct answer
How does Santa Clara bathtub reglazing work?
Reglazing renews a fixture in seven steps: mask and ventilate, deep-clean, repair chips and rust, acid-etch or scuff-sand, prime, spray several acrylic-urethane coats, then cure and re-caulk. Most single-fixture jobs finish in 3–5 hours, same day.
How soon can I use it after reglazing?
The surface is dry to the touch within a few hours and ready for normal use 24–48 hours after the final coat cures. We give you the exact ready time based on your bathroom's temperature and ventilation before we leave. To start the process on your fixture, book your Santa Clara reglazing appointment online or call (669) 337-6184, Mon–Sat 8 AM–6 PM.
A finish is only as good as the prep under it
Reglazing fails for one reason almost every time: prep was skipped or rushed. The acrylic-urethane topcoat that makes a tub look new is the easy part. What decides whether that finish lasts 10–15 years or peels in twelve months is everything that happens before the spray gun comes out — the cleaning, the repair, the etch or scuff-sand, and the bonding primer. That's why our crews spend more time prepping a fixture than coating it, and why every Santa Clara job follows the same sequence whether it's a cast-iron tub in the Old Quad or a gelcoat shower in a Lawrence Station condo. Daniel Pormier has run this exact sequence on Santa Clara fixtures since 2013, and it's the reason the warranty means something.
Below is the full process, step by step, exactly as it runs in your bathroom. Most single-fixture jobs take about 4.5 hours from masking to re-caulk, and 92% are finished the same day they start. This is the same sequence we have run on more than 1,860 Santa Clara fixtures since 2013, and the discipline behind it is why fewer than 1.7% have ever come back under warranty.
The seven-step reglazing process
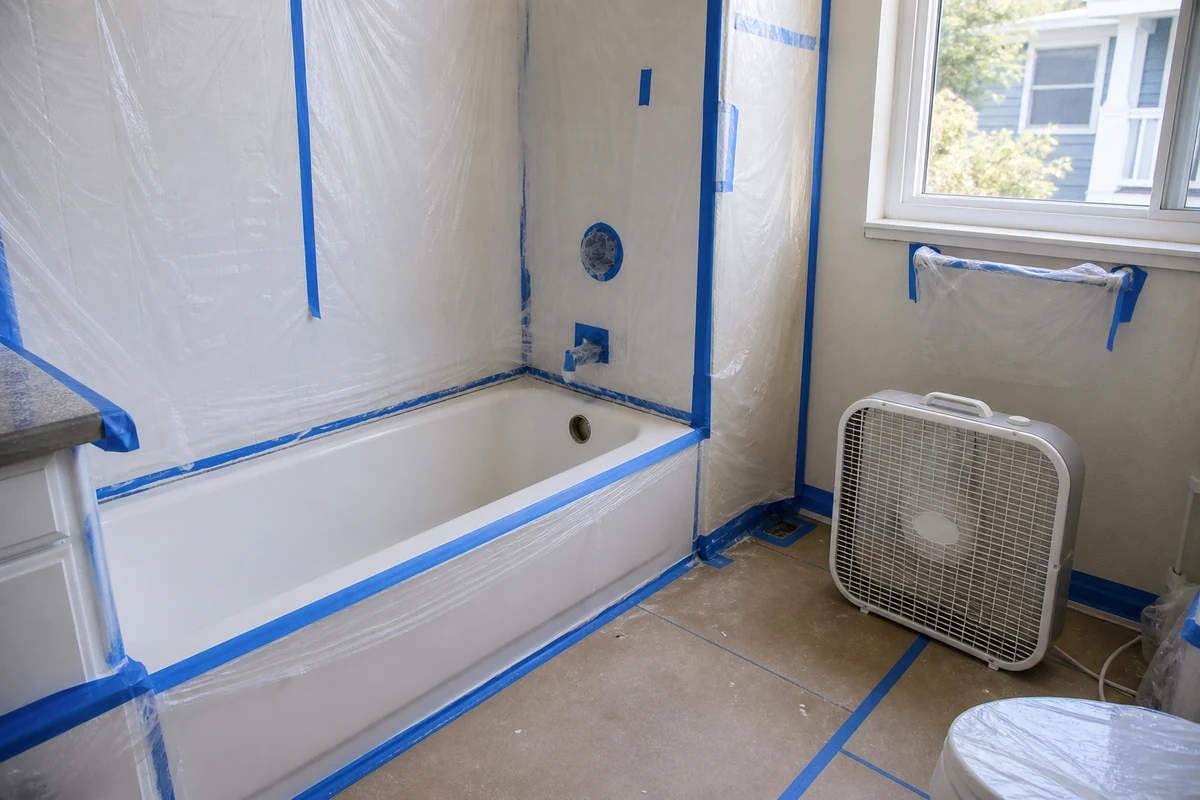
- Mask, ventilate and protect. We tent the work area in plastic, mask the walls, floor, fixtures and trim with painter's tape, and set up fans to move air. This containment keeps overspray off everything around the tub — critical in the tight condo bathrooms around Santa Clara Square where there's no room to spare. Old caulk and removable hardware come off so the new finish reaches the edges cleanly.
- Deep-clean and degrease. Soap film, body oils, hard-water scale and the residue of old cleaners all sit on the surface and will stop any coating from bonding. We scrub the fixture with industrial degreasers and abrasives until it's chemically clean — not just visually clean. On a tub that's been used for decades in a Bowers bungalow, this step alone removes a layer most people never knew was there.
- Repair chips, cracks and rust. Chips get filled, hairline cracks are opened and bonded, rust spots around drains and overflows are treated and built back up, and worn areas are leveled. We sand each repair dead flat so it disappears under the topcoat rather than telegraphing through it. Fiberglass holes and soft spots are reinforced before anything else goes on.
- Etch or scuff-sand for adhesion. Porcelain and enamel surfaces get an acid or silane etch that micro-roughens the glaze so the primer can grip — you can't bond a coating to glass-smooth porcelain without it. Fiberglass, acrylic and gelcoat are scuff-sanded and wiped with an adhesion promoter instead, because acid won't profile a plastic surface. Matching the right prep to the material is the single biggest reason our finishes hold.
- Apply the bonding primer. A tie-coat primer goes down over the profiled, clean surface. This is the chemical handshake between the old substrate and the new finish — it bonds to the etched or sanded surface below and gives the topcoat something to lock into above. Skipping the primer is the most common shortcut in failed DIY jobs, and it's never optional for us.
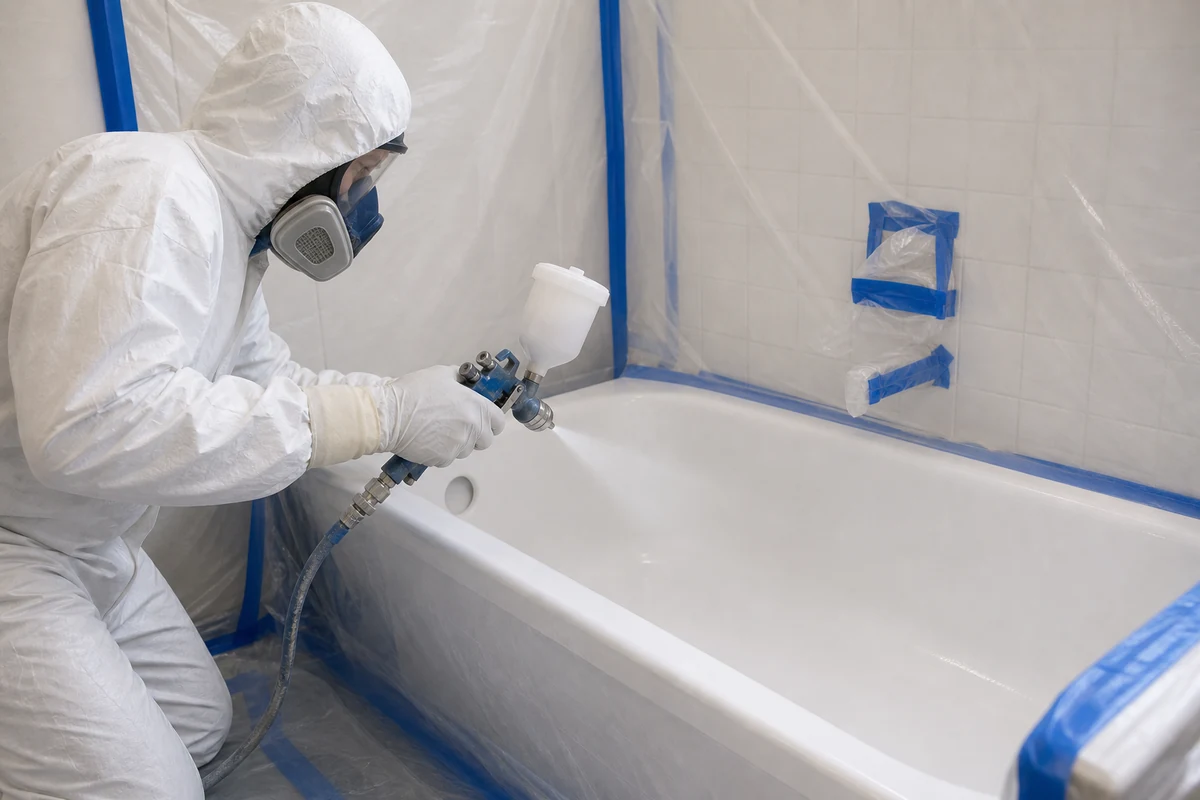
- Spray multiple acrylic-urethane coats. We spray several thin, even coats of acrylic-urethane with an HVLP gun in a controlled pattern, letting each pass flash before the next. Thin coats sprayed correctly flow out to a hard, glass-smooth gloss with no brush marks, no roller texture and no orange peel. The result reads like a factory finish because it's applied the way a factory would — atomized and even, not brushed on.
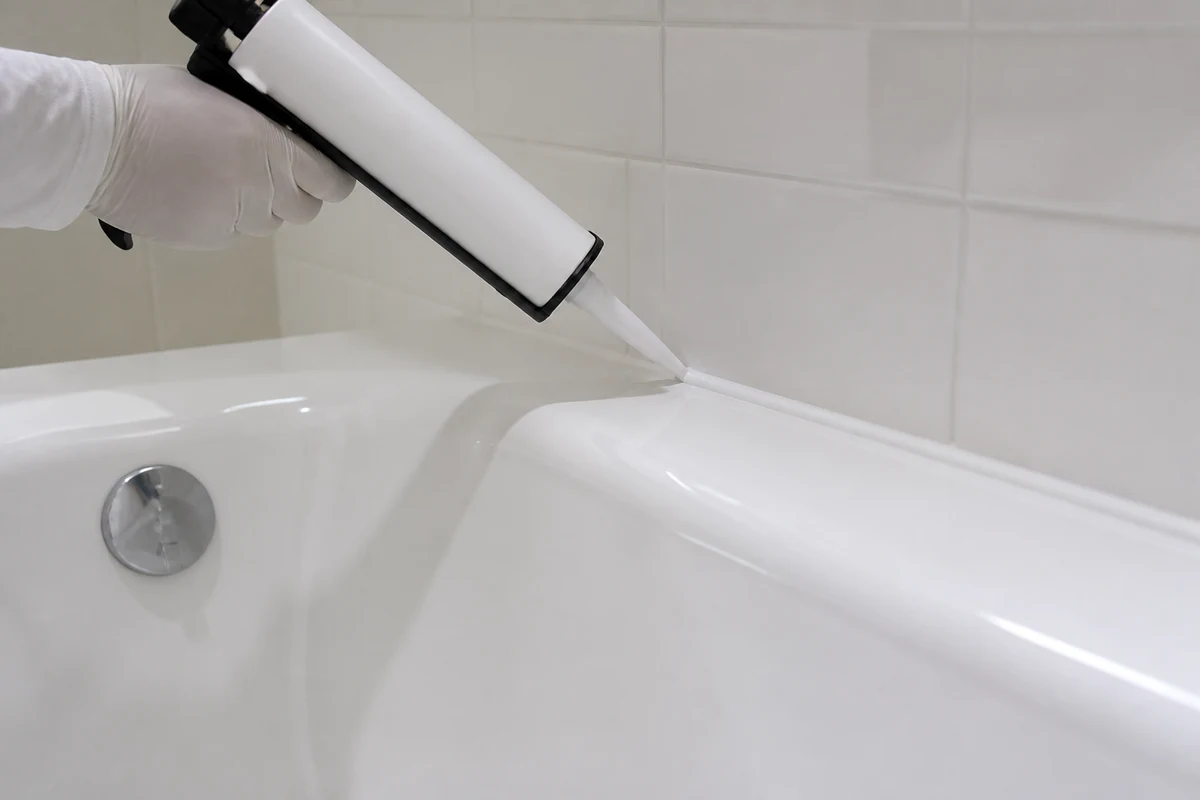
- Cure, re-caulk and hand back. The finish is dry to the touch within a few hours and fully cures in 24–48 hours, after which the surface is ready for normal use. We pull the masking, lay a fresh bead of white silicone caulk along the tile-to-tub joint, wipe everything down, and leave you the warranty paperwork along with care instructions. You get back a clean bathroom and a fixture that looks new.
What each stage looks like
The photos below show the three stages that matter most: the masked-and-contained prep, the controlled spray, and the finished re-caulk.
How the prep changes by material
The steps stay the same; the prep adapts to what's in front of us. Santa Clara housing covers the whole range, so the crew reads the fixture before they touch it.
| Surface material | Prep method | Typical result |
|---|---|---|
| Porcelain over cast iron | Acid/silane etch + bonding primer + acrylic-urethane topcoat | Factory-smooth, lasts 10–15 yr |
| Porcelain over steel | Etch + primer + topcoat | Smooth, chip-resistant edges |
| Fiberglass / gelcoat | Scuff-sand + adhesion promoter + topcoat | Restores faded, crazed gelcoat |
| Acrylic | Solvent prep + flexible bonding coat | Even color, hides scratches |
| Cultured marble | Repair + primer + topcoat | Removes yellowing and etching |
| Ceramic tile | Clean/etch grout + bond coat + topcoat | New color without tear-out |
California safety & compliance, the part most quotes skip
Spraying a two-part coating inside a Santa Clara bathroom is regulated work, and the rules are not the same here as they are in Southern California. We work to three sets of requirements on every job, and we think it's worth showing you exactly what they are — partly because they protect your household, and partly because the compliant way is also the way that makes the finish last.
Low-VOC, CARB-compliant coatings under BAAQMD rules
Santa Clara sits in the jurisdiction of the Bay Area Air Quality Management District (BAAQMD), and the coatings themselves fall under the California Air Resources Board (CARB) statewide limits on volatile organic compounds (VOCs) in architectural and specialty coatings. We use acrylic-urethane systems formulated to meet those VOC limits rather than the high-solvent products that were normal in this trade twenty years ago. That choice matters in a Santa Clara bathroom for a practical reason as much as a legal one: a compliant, lower-VOC product off-gasses less into a small enclosed room, clears faster, and is far less likely to leave that body-shop smell lingering in a condo with one small window. Picking the right compliant product for the substrate is part of the quote, not an afterthought.
HVLP spray with capture and containment
We spray with HVLP (high-volume, low-pressure) guns, which atomize the coating at low pressure so more of the material lands on the fixture and less drifts as overspray mist. Combined with the plastic containment tenting and the fan-and-filter setup from step one, that keeps the spray where it belongs — off your mirrors, off the next room, and out of the building's shared air. In the tight bathrooms around Santa Clara Square and the older units near Mission College, that capture-and-containment discipline is the difference between a clean job and a complaint from the unit next door.
EPA RRP lead-safe work on pre-1978 Santa Clara homes
A large share of Santa Clara's housing predates 1978 — the postwar bungalows of the Old Quad, the streets around Bowers, Pruneridge and Northside — and homes from that era can carry lead-based paint, including on the surfaces and walls around an original cast-iron tub. The federal EPA Renovation, Repair and Painting rule (40 CFR Part 745) governs how anyone disturbs those surfaces. On a pre-1978 fixture our prep follows lead-safe practice: we treat suspect surfaces as if lead is present unless testing says otherwise, contain the work area, control dust rather than sanding dry into the open air, and clean up with HEPA filtration instead of a shop vac that would just redistribute fine particles. Most refinishers quietly ignore this on a tub job. We don't, because the people who live with the result are usually standing in the next room.
Isocyanate cure chemistry, Prop 65, and why DIY is riskier here
The durability of a sprayed two-part finish comes from isocyanate cure chemistry — the same family of reactive chemistry that makes automotive clearcoats hard. During application and the first part of the 24–48 hour cure, those components are something you do not want to breathe, which is why California's Proposition 65 calls out isocyanates among the chemicals that require a warning. Our crews use supplied-air or properly rated respirators and forced ventilation during the spray, and we keep the space ventilated through the early cure. This is the single most underappreciated reason a drugstore DIY kit is riskier than it looks: a homeowner brushing a kit on in a closed bathroom with no respirator and no real ventilation is exposed to the very chemistry the professional setup is built to control. The compliant, protected method isn't just better for the finish — it's the safe way to put this kind of coating into a home.
The warranty that backs the work
- A 5-year written warranty against peeling and adhesion failure.
- Fully licensed and insured, with liability and workers' coverage.
- Warranty paperwork left with you when the job is done.
- Written care instructions so the finish lasts its full life.
- Honest routing: if a fixture is better replaced, we say so before we start.
- Clean containment and fresh re-caulk on the way out, every time.
Why this process holds up across Santa Clara
The reason a sprayed acrylic-urethane finish lasts 10–15 years and a DIY kit peels in three comes down to that prep sequence and the spray itself. A drugstore kit hands you a brush or roller, no acid etch, and no real bonding primer, then asks you to coat a glossy surface that the new finish has nothing to grab. It looks fine for a season, then it lifts at the corners and peels in sheets. We've stripped enough failed kits off Santa Clara tubs to know exactly where they go wrong, and our process is built to avoid every one of those shortcuts.
It also holds up because we match the method to the material. The postwar Old Quad and the streets around Bowers and Pruneridge are full of cast-iron and porcelain-on-steel tubs that need a true acid etch. The 1980s–2000s condos in Rivermark, Santa Clara Square, Forest Park and Lawrence Station run gelcoat fiberglass and cultured marble that you'd ruin with acid and that need scuff-sanding and an adhesion promoter instead. One process, adapted correctly, is why the warranty means something.
Want to see the result, or check the cost first? The before & after gallery shows real Santa Clara fixtures from each stage, the pricing page breaks the numbers down by fixture, and how long reglazing lasts covers the care that keeps the finish at its best.
Process FAQ
What's the difference between reglazing, refinishing and resurfacing?
They name the same process described on this page — bonding a fresh acrylic-urethane coating to a prepped surface. None is a tub liner, a plastic shell dropped over the old tub, and none is a replacement. The seven steps above are what all three terms actually refer to.
Why does prep matter more than the topcoat?
A reglazing finish is only as good as what it bonds to. The etch or scuff-sand, the deep clean and the bonding primer are what make the coating grab the substrate. Skip them and the topcoat peels within a year, which is why DIY kits fail and our prep is the longest part of every Santa Clara job.
What is the etch step and why is it needed?
Etching is an acid or silane treatment that micro-roughens porcelain and enamel so the primer can lock in. Fiberglass and acrylic are scuff-sanded instead and treated with an adhesion promoter. Either way, the goal is a clean, profiled surface the new coating can bond to.
How do I care for the finish so it lasts?
Wait the full 24–48 hours before first use, then clean with a non-abrasive liquid cleaner and a soft cloth, skip scouring powders and abrasive pads, and keep suction-cup mats out of the tub. Cared for this way, the finish holds its gloss for 10–15 years.
What does the warranty cover, and are you licensed and insured?
Our 5-year written warranty covers peeling and adhesion failure of the finish under normal use and care. Santa Clara Bathtub Refinishing is fully licensed and insured, carrying liability and workers' coverage, and we leave the warranty paperwork with you when the job is done.
Are your coatings low-VOC and compliant with California rules?
Yes. We use acrylic-urethane systems formulated to meet California Air Resources Board (CARB) VOC limits, and we work within Bay Area Air Quality Management District (BAAQMD) requirements, not the South Coast rules that apply in Los Angeles. HVLP spraying plus containment keeps overspray off your home and out of shared air, and a lower-VOC product clears a small Santa Clara bathroom faster.
Do you take lead-safe precautions in older Santa Clara homes?
Yes. On pre-1978 homes — common across the Old Quad, Bowers and Northside — we follow the EPA Renovation, Repair and Painting rule (40 CFR Part 745): contain the work area, control dust rather than sanding dry, and clean up with HEPA filtration. The cure also relies on isocyanate chemistry that Proposition 65 flags, so our crews use rated respirators and ventilation — protection a DIY kit user rarely has.
Book Santa Clara reglazing today
Open Mon–Sat 8 AM–6 PM. Fully licensed & insured, with a 5-year written warranty on every finish.